2FA, OR NOT 2FA
Greetings! My name is Jaden Bowers. Throughout the course of this Spring 2026 semester, I had the privilege of working under Dr. Nick Toothman as a server-side development assistant on his MeXanimator project. While the possibilities on this project seem endless, there were a few very important pieces of work that Dr. Toothman wanted to see implemented in his project, and I was able to help the absolute best I can at making these visions a reality.
The first few weeks, I was honestly just getting familiar with the dev environment, along with trying my best to read through the pre-existing code & schemas to understand how they were working. Let me tell you, I was CONFUSED. It proved to be quite challenging at first as I have surprisingly never used Flask in a project before (which is the main framework this was built from). Coming from a background in TypeScript development, the context switching was a bit difficult, but it didn’t take long to start piecing this new Flask material together. On top of that, I had little experience with SQLite (as for my own projects, I focus on MariaDB & PostgreSQL) but it honestly wasn’t bad once I realized it’s baaaasically the same thing.
Now that I felt comfortable, and added the slightest bit of CSS improvement to a completely CSS-less website (just enough so that my eyes didn’t bleed while looking at the page), I was able to start on my primary task: producing a fully functional 2FA (two-factor authentication) system that integrated perfectly with the existing account system.
There were a lot of different components to make the system truly functional. I started off with research about the best Python packages that I could use to tie into the existing codebase. And boom, I had it: PyOTP, a package that implements one-time password algorithms along with many useful functions surrounding it, QRCode, a package that - well, I bet you can guess what it does (it makes a QR code, easy), and Pillow, providing image-related support. I was debating on whether or not to use the Flask-Login library, but decided against it as Dr. Toothman already had a great login system / user management system in place. Why change what already works?
And from there, I started coding.
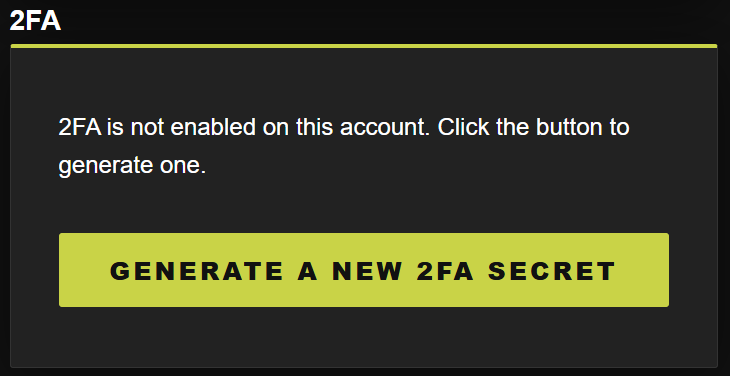
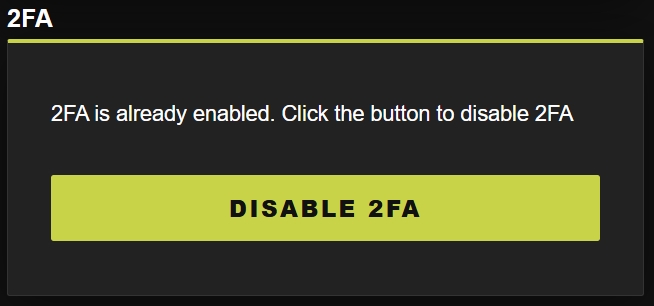
Long story short, what I did was implement a brand new option in the Account Settings tab of the MeXanimatoR website to enable 2FA on a user account. This option was conditionally written on page-load depending on three user cases. The first case is simple: if the user already has 2FA enabled, a message displays telling them it’s active with an extra option to re-generate a new 2FA QR code to scan with their authenticator app if they wanted. The second case is also quite simple, if a user does NOT already have 2FA enabled, they have the option to generate a QR code to scan with their authenticator app. The third case is the state in which a user has just clicked the button to generate a QR code, and it displays itself on the screen. This was definitely the most complicated out of the three states, because I needed to find a way to make this QR code display ONE time and ONE time only. I ended up using a buffer that is only active one time, and disappears forever on refresh. It wasn’t too bad after all!
Here is the code for DISPLAYING the 2FA Section in the Options Menu:
<h3 id="2FA">2FA</h3>
  <form method="post">
    {% if twofa_pending %}
      <h3>Here is your new 2FA QR code. This will only display ONCE:</h3>
      <img src="data:image/png;base64,{{ qr_code_image }}" alt="Scan QR Code", width="200px", height="200px">
      <br>
      <label>Confirm 2FA code:<input type="number" max="999999" name="2FAConfirmation" required></label><br>
      <input type="submit" name="Confirm2FACode" value="OK">
    {% elif twofa_enabled %}
      <p>2FA is already enabled. Click the button to disable 2FA</p>
      <br>
      <input type="submit" name="Disable2FA" value="Disable 2FA">
    {% else %}
      <p>2FA is not enabled on this account. Click the button to generate one.</p>
      <br>
      <input type="submit" name="Generate2FASecret" value="Generate A New 2FA Secret">
    {% endif %}

  </form>
Here is how what actually happens behind the scenes whilst creating the 2FA secret to share with the authenticator app:
elif ('Generate2FASecret' in request.form):
            print("Generating pending 2fa secret...")


            pending_2fa_secret = pyotp.random_base32()
            session['pending_2fa_secret'] = pending_2fa_secret


            return show_pending_2fa_qr(pending_2fa_secret)

        elif ('Confirm2FACode' in request.form):
            print("Confirming 2FA")
            required_fields = ['2FAConfirmation']


            for rf in required_fields:
                if (rf not in request.form):
                    flash(f"Missing required field: {rf}", "error")
                    return redirect('settings')


            if ('pending_2fa_secret' not in session):
                flash(f"Pending 2FA secret not found", "error")
                return redirect('settings')

            user_entered_twofa_code = request.form["2FAConfirmation"]
            pending_2fa_secret = session['pending_2fa_secret']


            print(f"Confirming 2FA code {user_entered_twofa_code} for {session['username']}")


            totp = pyotp.TOTP(pending_2fa_secret)
            if not totp.verify(user_entered_twofa_code):
                flash(f"Incorrect 2FA code", "error")
                return show_pending_2fa_qr(pending_2fa_secret)

            # At this point, the user has confirmed the 2FA by entering a correct authcode
            # that verifies with the pending secret. We can now remove the secret from
            # the session and update the account in the database.
            session.pop('pending_2fa_secret')


            twofa_master_key = Creds.twofa_master_key
            fernet = Fernet(twofa_master_key.encode())


            encrypted_2fa_secret = fernet.encrypt(pending_2fa_secret.encode())


            db = get_db()
            cur = db.cursor()


            try:
                res = cur.execute("""
                – REDACTED SQL CODE
                """, (encrypted_2fa_secret, session['accountid']))


                if (res.rowcount == 1):
                    flash(f"2FA enabled!")
                    db.commit()
                else:
                    flash("unable to update 2FA status", 'error')
                    db.rollback()
            except sqlite3.Error as er:
                flash(f"Error setting 2FA status: ({er})")

        elif ('Disable2FA' in request.form):
            print("Disabling 2FA")


            db = get_db()
            cur = db.cursor()


            try:
                res = cur.execute("""
                – REDACTED SQL CODE
                """, (session['accountid'],))
                flash(f"2FA removed from account")
            except sqlite3.Error as er:
                flash(f"Error disabling 2FA: ({er})")

            cur.close()
            db.commit()


            return render_template("settings.html", username=session['username'])
And, here are the displays:
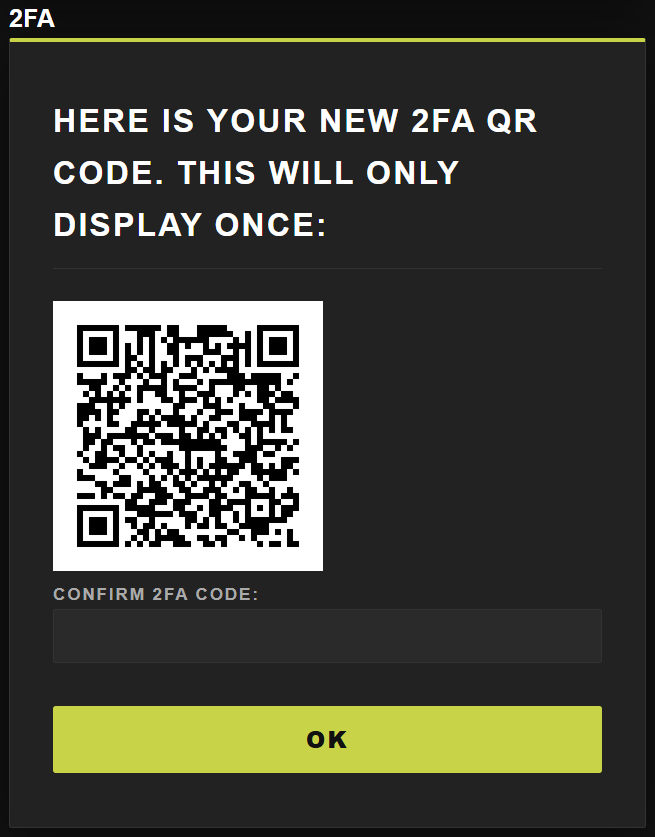
As far as it goes for the QR code itself, it contains data about the secret generated by PyOTP, as well as a label to display in the user’s choice of Authenticator app (Microsoft Auth, Google Authenticator, etc…). This way, once the user scans the QR code through their app, they will have that secret key saved allowing them to authenticate themselves by inputting their correct six digit code (displayed on their Auth app) whilst prompted on MeXanimatoR when logging in. One really great feature Dr. Toothman added after the fact, too, was the need for the user to actually enter the six digit code generated by their authenticator app instantly after scanning the QR code (as shown in Screenshot 2). If the code didn’t match, 2FA wouldn’t be enabled.
This code snippet below is where the URI is created (that contains the payload of information that will end up going into the URL for a user’s authenticator app), and then turned into the visual URL. It then gets sent to the frontend as a Base64-encoded image, where it can be embedded directly in the page and scanned by the user’s authenticator app:
def show_pending_2fa_qr(pending_2fa_secret):
    uri = pyotp.totp.TOTP(pending_2fa_secret).provisioning_uri(name=session['username'], issuer_name="MeXanimatoR")

    account_qrcode = qrcode.make(uri)


    buffer = io.BytesIO()
    account_qrcode.save(buffer, format="PNG")
    buffer.seek(0)
    account_qrcode_base64 = base64.b64encode(buffer.read()).decode()
    return render_template("settings.html", username=session['username'], qr_code_image=account_qrcode_base64, twofa_pending=True)
As far as changes made to the database schema, I simply added two new columns inside of the “account” table: a column that checks if the user has 2FA enabled or disabled, as well as a column that stores the secret in a hashed manner. They are both quite self explanatory, they help the system determine if the user logging in or not is going to need to put in a code. If they DO need to put in a code (as in, the 2FA on their account IS enabled), the 2FA pop-up will display whilst logging in and won’t authenticate them until they successfully enter the correct six digit code. It stores the login information they used as client-side storage as long as they entered the correct username and password, and then if they enter the correct code, it will complete the login. Another important thing to note, as you can probably tell, is that the column that stores that secret generated by the QR code is in a hashed form. So, when the user enters into the 2FA prompt the six digit code from their authenticator app, it gets compared to the secret stored inside of that user’s row through PyOTP functions to see if it matches up. The Cryptography library made this easy. Other than this, all I really had to do was write the actual Flask code that would make this all function through some simple API calls, and it was working! All of these pushed changes through my testing environment successfully got integrated with the production environment, it was a very special moment for sure.
Here is a screenshot of the 2FA login prompt for users with 2FA enabled:
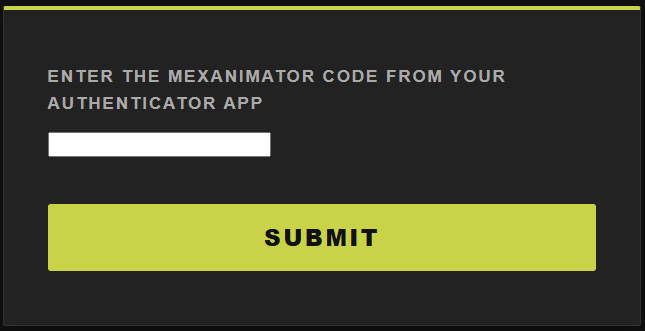
And here is the code for actually authenticating the 2FA code when a user submits it while logging in. If a user successfully enters the 2FA code correctly, their “pre_2fa” session variables get stored to the real session variables:
@account.route("/2fa", methods=('GET', 'POST'))
def twofa():
    if (request.method == "POST"):
        required_fields = ['2fa_code']


        for rf in required_fields:
                if (rf not in request.form):
                    flash(f"Missing required field: {rf}", "error")
                    return redirect("2fa")

        user_entered_twofa_code = request.form["2fa_code"]
        print(user_entered_twofa_code)


        db = get_db()
        cur = db.cursor()


        cur.execute(" – REDACTED SQL CODE ", (session['pre_2fa_accountid'],))
        result = cur.fetchone()


        cur.close()


        if result:
          user_2fa_secret = result[0]


          twofa_master_key = Creds.twofa_master_key
          fernet = Fernet(twofa_master_key.encode())


          decrypted_user_2fa_secret = (fernet.decrypt(user_2fa_secret)).decode()


          totp = pyotp.TOTP(decrypted_user_2fa_secret)
          if totp.verify(user_entered_twofa_code):
              session['accountid'] = session['pre_2fa_accountid']
              session['username'] = session['pre_2fa_username']
              session['email'] = session['pre_2fa_email']
              session.pop("pre_2fa_accountid")
              session.pop("pre_2fa_username")
              session.pop("pre_2fa_email")
              return redirect('settings')
          else:
              flash(f"Incorrect 2FA code", "error")


    return render_template("2fa.html")
Aside from this 2FA functionality, I was also able to work on adding environment variables for the project as a whole (instead of hard-coding different URL paths, secrets, etc…) to make pushing and pulling from development to production and production to development much less painful. This wasn’t too much of a huge moment for me, but it still made me happy.
Overall, I had a great semester working on this project with Dr. Toothman. I am extremely thankful that he chose me to be part of this exciting and unique project, as well as each and every way he has led me throughout my time here at CSUB. I cannot wait to see where this project goes, and I’m so glad I was able to add my contributions.